Showing posts with label tricks. Show all posts

Thursday, 7 May 2015

10 Tips and Tricks of WhatsApp you should know

Top 10 Tips and Tricks of WhatsApp which all the users of this addictive app should know

WhatsApp has almost half billion users across the world. Its the most commonly used app however wonder how many users would claim to know the app thoroughly in the sense there are minute details which most of the users are not aware of like how to lock the app or say how to avoid downloading unwanted media files or simple methods to send the important data across to some friend. In this article we will try to go through certain tips and tricks useful in day to day activities of the users while using the WhatsApp:
  • Get connected to WhatsApp without any phone number: User needs to get connected to Internet via Wi-Fi or modem and get WhatsApp installed in the smartphone. For installation user needs to  visit the official site of WhatsApp and click the application to get it downloaded. Once the app gets downloaded it gives the welcome screen, just click the “Agree to the terms” and then user would be asked to provide the phone number so user needs to type their phone number and click OK. In the next 10-15 minutes the verification process will begin, in the meantime the downloaded application gives a text message in this user needs to click the “call me to confirm” and user gets a call from WhatsApp followed by a verification code on the phone number that they provided. Type this verification code in the downloaded application’s screen and soon the WhatsApp would be activated on the smartphone without any phone number.
  • Change your WhatsApp phone number: Most of the time the Phone number synced with the WhatsApp is seen by other users and suppose if user is using multiple phone numbers then user will have to uninstall and reinstall their WhatsApp to change the synchronized phone number. An easy way to change the synchronization of the WhatsApp number is present in the WhatsApp application : Go to ‘Settings’ then ‘Account’ then ‘Change number on your WhatsApp’, here user would need to type their new phone number in the first field and then in the lower field add the old phone number and click Done. The new phone number needs to be validated and all the chat history and WhatsApp data get transferred to the new phone number as this number has now been synchronized to WhatsApp. User needs to understand that the device is same and only the phone number has been changed in this case.
  • Need to Send files that are not officially supported by Android: WhatsApp has some limitation to its file sharing capability. RAR, ZIP, PDFs, .EXE, APKs, Word files and the files which are more than 15MB cannot be shared through WhatsApp. Users need not worry, now they can download the CloudSend app and upload the required file through this app then copy the link and send it across to the person via WhatsApp. When recipient clicks on the link they will be able to download the file without any restrictions.
  • Stop Automatic media download in WhatsApp: Media files like images, videos, audio files get downloaded automatically in WhatsApp previously users needed the WhatsApp plus application to stop this download. However, now WhatsApp has included this feature in its configuration settings and users can choose whichever images or videos they want to download hence controlling the overall space in the device.
  • Users can create Fake WhatsApp Conversation: There is an application “Whatsaid – Whatsapp Prank 1.2″, users can download this from http://whatsaid-whatsapp-prank.soft112.com/. Users can start fake conversation using a different display picture, last seen and even personal settings. Now, this app is mostly used by celebrities, common users can use this fake conversation just as a prank.
  • Disabling the “Last Seen” time stamp: WhatsApp’s feature of Last seen timing is helpful to know when the friend was online however it can also be frustrating as it gives away the personal information of the user and hence is a threat to user’s privacy. Now users can learn the trick of disabling the Last seen time stamp. User just needs to go in WhatsApp settings : Click on Account; Click the ‘Last seen’ button and make the necessary changes. This feature is available both in iOS as well as Android users and user can easily disable the “Last seen” time stamp however if user is online it will still show up.
  • Locking of WhatsApp: Yes locking of the WhatsApp is possible. For Android users they can download the “Messenger and Chat Lock” from https://play.google.com/store/apps/details?id=com.whatsapplock. For iPhone users they can download “Password for WhatsApp” from http://www.app-pocket.com/app/password-for-whatsapp/ and for Blacberry users “Lock for WhatsApp Messenger” can be downloaded from https://appworld.blackberry.com/webstore/content/27179877/?countrycode=IN&lang=en.
  • Managing the notification sounds: The sounds and notifications especially from the Group chats can be frustrating hence user can manage the notification and the message sounds by going to Settings and then Notifications and turn off the sound and notifications from group chats.
  • Archiving all chats: Basically this helps users to back up and restore all the chats. WhatsApp has auto backup facility and users can also create manual backups for their WhatsApp chats. In case user changes the device or uninstalls the WhatsApp then WhatsApp restores the chat information automatically. For manual backup and restoration users need to follow these steps: In case of Apple iOS, users need to Go to Settings then Chat Settings then Chat Backup then click Backup. In case of Android : users need to Go to Settings then Chat settings and then click Backup chats. Android users need to make a note that this method will only take back up of the chats and for the media they will need to use a File manager to backup the media files in either of these Sdcard/WhatsApp/Media in their phones. On the contrary one more easier method for backup and restoration would be by using the Google Drive.
  • Users can use WhatsApp from their computer using a rooted Android phone: This is done by “over the air transfer of messages” from user’s rooted Android phone to a Computer running a modern browser like Chrome. Basically here user would need to Install WhatsAir app in their Android device, then grant it root permission. Please note that the Android phone is connected to the network of the computer through Wi-Fi. Click the start button and the WhatsAir app generates a password and gives a address which needs to be typed in the browser of the computer. This works fine with Chrome browser in the computer, the browser page will ask for a password and user needs to type the same password which the Android phone’s WhatsAir app had given while installation. After authentication process the Computer gets connected to the WhatsApp. Users need to understand that this connection stays till the web browser tab is closed or the stop button in app is clicked. Users can enjoy the WhatsApp messages from their Phone to computer and the replies would promptly go through Computer to phone.

Tuesday, 5 May 2015

How to use PC's Internet connection on Android device

You would probably aware with connect your computers with your smartphone, to use phone’s internet connection on your PC. Here we talk about the “reverse connecting” and let you know how to connect your android phone or tablet to your PC to use computer’s internet connection.
Note: To do this you need a rooted Android phone and a Windows PC, but keep in mind the steps are easy if your computer has WiFi to create WiFi hotspot using a utility connection.

Basics

Before we start using this utility, you must have USB debugging enabled on your android device. For this go to Settings >> Applications >> Development >> Check USB Debugging. Might be you would also disable SuperUser access notifications, for this go to SuperUser App >> Menu >> Performances >> uncheck Notifications.
Tip: In case you don’t see the SuperUser app on your phone, it means your phone is not rooted.
You also require installing device’s USB driver on your computer after getting from device manufacturer or finding it on Google.

Tools

connect android with pc
Image Credit: howtogeek.com
This is a Windows utility that uses ADB (Android Debug Bridge) that shares PCD’s Internet connection with your Android device using USB. It uses a duplicate of ADB, so you might not need the Android SDK installed on your computer. Download it from here.
Download and extract the downloaded ReverseTethering.zip file and run the AndroidTool.exe application inside its folder.

Connecting

android connect with pc
Image Credit: howtogeek.com
Plug your android device to your PC with USB cable, than go to Select a device >> drop-down box >> click Connect on “Android Reverse Tethering Tool”. Once it connected to your android device it installs Busybox and Redsocks on on your phone. Go to SuperUser and allow the USB Tunnel tool on your device.
At this stage if you face a crash close, you might have to repeat the above shared process again. Or keep clicking on “Kill ADB” on the Tools tab that may re-launch ADB process. As the tool manage to create a connection you wills see connection notification.

Usage

use pc internet on android
Image Credit: howtogeek.com
Once it got set up after following above shared steps, open the apps and use internet. This way you can use your Android device forward network circulation with USB cable to your PC, which help you to use your computer’s Internet connection. The Windows application will keep showing all information about the connections.
The above shared method is to use internet on your android device if you don’t have a WiFi connection or 3G facility on your android device. Otherwise to use internet through network 3G connection or WiFi would be the best solution for you. This way you would have to stay stick with your PC as your phone will be connected to your computer with USB cable as this method is to transfer data through cable not over the air.

Monday, 4 May 2015

How to unlock android phone lock pattern


Pattern lock is a useful tool to secure your Android phone. This lock is important to secure your sensitive files and data from the guest users. But the trouble starts when you forget your settled pattern; it would be irritating when you will not be able to use your phone because of this issue. We know you must be looking for the answer to this important question, “How to unlock Android phone pattern lock without factory reset”. This tutorial will help you to unlock your phone using your Google account.
The new devices usually have built-in unlock patterns, which is easy to use but after several wrong attempts it locks permanently. When it happens, you have to use your ID that you use in your Google Play store to unlock that forgotten pattern. But there is a problem with this method if you are not connected to the internet then you will not be able to unlock your phone without this method.
However, you don’t need to worry about, in this tutorial you will learn how to unlock and reset your Android device in case you have forgotten your phone’s pattern. Follow the given steps and get your work done without paying any cost to the experts.

1. Unlock Pattern with Google Account

When we try to unlock our phone using wrong patterns, a message appears with two options “next” and “try again”.
how to unlock android pattren
Step 1. Go with the “next” where you can see two options to unlock your phone, one is to answer the security question, and the other is to provide Google account details.
Step 2. If you have settled your security question, answer it and get your phone unlocked quickly. On the other hand, if you didn’t set security question you would have to provide your Google account details.
Step 3. After this process, you will be able to choose a new pattern to use for the next time.
By following above methods, you will be able to unlock Android phone pattern lock without a factory reset. Happy using your Android device! We hardly prefer this way to unlock your phone, it helps you to avoid important data loss and saves your time.

2. Unlock Pattern Without Google Account

 Step 1. Switch off your smartphone and wait for a while when switched off
Step 2. Press Volume up + Home Key + Power Button; hold these buttons until the phone boots. (If your device doesn’t contain ‘home’ button simply hold other two buttons)
Step 3. When your phone will boot, the screen will appear with different options
Step 4. Now scroll down the screen using volume key and choose “Restore Factory Defaults” or “Delete all User Data” depending on the options shown by your device.
Step 5. After the above settings, choose the “Reboot System Now” and wait for your phone to reboot
Caution
  • This way you may lose all your data and apps through operating it without Google account.
  • This is general factory reset option to unlock your phone, but for specific phone’s factory reset you have to search for your Android phone or tablet.

Saturday, 2 May 2015

Clear -App to delete your social media posts

If you want to delete your social media posts, but you don’t have time to take care of all of your social media accounts to manually delete those posts, don’t worry a new app is here to help you.
This app can be connected with your Twitter, Instagram and Facebook accounts and analyzes your history and flag posts with unsuitable content. The app is following a combination of algorithms and “IBM’s Supercomputer Watson” to filter the available content on your social accounts.
Ethan Czahor created that app and made the headlines earlier in 2015, when he abruptly resigned in less than 48 hours after joining the job. From Jeb Bush’s operation after a sequence of years-old aggressive tweets textured — some of which involved imageries of women as “sluts” and hat speeches about being judged up by gay men at a San Francisco gym.
Clear app to delete offensive posts

Czahor the creator of that app added his views and shared tweets were “harmless” jokes, leftovers of his time with an improved comedy collection, which were engaged out of situation.
Get the Clear App Today! (iOS version is available but it is not for android yet)
“I was very well aware going in, [politics] was a one-strike-and-you’re-out business,” Czahor toldMashable. “I just didn’t think i would strike out so soon, and in that way.”
Now the app named ‘Clear’ is able to identify offensive or embracing posts with a specific keyword based algorithm like profanity. It also doesn’t allow posting anything that mention a gender group like gay or women. Czahor argues any reference of groups is anywhere you’re probable to exchange views in generalizations and typecasts.
“Whether it’s good or bad, you should probably take a second look at it,” he says.
IBM’s Watson also uses sentimentality examination system, emphasizing posts it detects as using mostly unwanted words. The app then deliver its great services depend on the score to see how many posts flagged.
The app follow the user reviews on the post and delete the offensive content, this app makes your work easier with shortcuts. The developer of that apps stated Clear is still in progress, so it needs several amendments and the accuracy of the app will be improved over time.
Excitingly, the app is able to highlight tweets with protests about particular products, that you did years ago but you didn’t delete that one. So this app would be an awesome addition in your social media journey toDelete Your Embarrassing Posts from Social Media.

Saturday, 25 April 2015

How To Recover Data From An SD Card Or Hard Drive


Are you worried about the files which are deleted ? If yes then don’t worry since there are lot of softwares and tools to recover deleted files from your disk but few works and few might not. Here is the best software that we suggest you to recover your deleted files from your disk. This software have free version and paid version too, its better you go with free version. Using free version we can recover almost all the files which have been deleted or corrupted or formated accidentally.


File Name :- Recuva
File Size :- 4.5 MB
System Requirements :- Windows 8.1, 8, 7, Vista and XP.
Download Link :-http://www.piriform.com/recuva/download (Link will open in a new tab)

Tuesday, 21 April 2015

Google's fun Trick That You'd Love to Know

Internet is Google and Google is Internet for many of us. You use Google everyday but you will not be knowing some tricks, funny searches and games that Google provides hidden behind its vast layers of database.
1. Do a barrel roll trick: google-barrel-roll-trick-pic
Go to Google.com and simply type in the search box “do a barrel roll” and see the magic . The page will rotate two times.
2. Atari Breakout Trick:atari-breakout-trick-pic
Go to Google images and type “Atari Breakout”. The images will be transformed into blocks and you can play Breakout ,classic arcade game of the 70’s era.
3. Tilt page trick:google-tilt-pic
Search for “tilt” on Google and see how your page tilts a little .
4. Recursion trick:
Search for “recursion” on Google and you will get stuck in an infinite loop much like recursion . Recursion means repeating. Google will show “did you mean recursion?” every time  searching for recursion . It is a fun act of Google for all the geeks who understand what is recursion.
5. Google Gravity:

Type in “Google Gravity ” in their homepage and then click on the “I’ m feeling lucky” button. It will redirect you to one of the fun projects called “Google Gravity”. It is a Chrome Experiment done by Hi-Res. See how gravity bring Google to its knees. You can even search anything.
6. Zerg Rush:google-zerg-rush-pic
When you type “zerg rush” in Google .The ‘o’ and ‘o’ of Google appears from the top and the right of the Google page and slowly eats up the whole page leaving nothing . Its fun to watch.
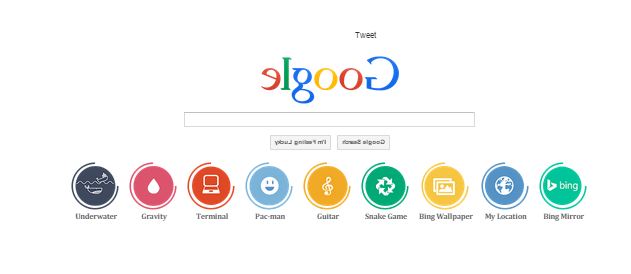
7. Bonus: elgoog.im
A rotated version of Google.com, kind of google tricks. Provides you with a reversed Google site, known as Google backwards. You can also do surfing on elgoog.im, it’s fun.elgoog-im-image
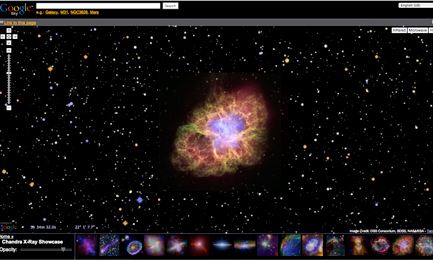
You can fly through space using Google sky. You can see  celestial objects, including stars, constellations, galaxies, planets and the Earth’s moon via Google sky.
google-sky

Saturday, 18 April 2015

5 Facebook Secrets


1. Facebook tells where you are located

“How did you know I was here?” The answer: It was on your Facebook page.

Facebook is built around sharing. You share thoughts, photos, videos and news, and now you can share your location, too, with Nearby Friends. When turned on, it alerts you when friends are nearby.


Nearby Friends, available in the Android and Apple Facebook apps, is currently available in select areas. To check if you have it, open your Facebook app, tap the icon with the three horizontal lines in the upper right corner for Android users – it’s on the lower right for Apple fans – select Nearby Friends and finally, Turn On.

From here you can choose who can see your location (Note: Some versions require you to click the gear icon in the upper-right corner). By default, it's set to Friends, and thankfully you can't set it to Everyone. You can, however, choose a list of friends, like Family or a custom list you've created.

You can share your location temporarily with someone. In Nearby Friends, find a friend on the list and tap the arrow icon next to his or her name. Select how long you'd like to share your location.

2. Facebook tracks you

Facebook is part of a major advertising network. It shares your Facebook profile information with other companies and, in return, gets their information about you. That allows the companies to better target you with relevant ads. It also means they're building a detailed profile of your likes, dislikes and online browsing habits.

You can stop this tracking by visiting the Digital Advertising Alliance, which is the network Facebook uses, and opting out.

You will also need to opt out of targeted ads on your smartphone or tablet.

3. Facebook adds fun

When you send text messages or emails, you can include those cute little smiley faces, called emojis or emoticons. So why can't you put emojis in Facebook posts?

Facebook actually has more than 400 emoticons in its library – if you know how to create them.

These go way beyond just the smileys and hearts. There are emojis for professions, body parts, food, animals, flowers, weather, buildings, vehicles, holidays, directions and more.

You can also send fun emoticons and stickers to your friends through Facebook chat or comments. In the chat or comment window, click or tap the smiley face icon. You'll see some default emoticons and stickers you can choose from. If you want to expand your options, there's a sticker store where you can download additional sticker packs. Just click the blue “plus” sign in the upper right corner of the sticker window.

4. Facebook rats you out

If you use Facebook messages, you've probably noticed the "seen at" text that appears when you open one. This tells the person who sent the message that you've looked at it. For the person sending the message, it's a nice way to know that you've seen it, and when you saw it.

On the other hand, if you don't respond to the message right away, it looks like you're ignoring the sender. Of course, you could shoot off a quick response like "I'll get back to you later," or something similar, but should you have to?

If you use Facebook in the Chrome browser, there's an extension called Facebook Unseen that will keep Facebook from knowing when you read a message. On Android and Apple, you can try the Facebook Messenger replacement appsPrivy Chat or Unread.

5. Facebook checks your privacy settings

Privacy is important, and Facebook hasn't always been good about helping you out in that area. That's why its Privacy Checkup tool was such a welcome surprise. But a lot of people don't know it exists.

To find it, open Facebook, click the “lock” icon in the upper-right corner and select Privacy Checkup. Facebook will help you set who can see your posts, manage the apps you have installed and let you choose the visibility of your personal information.

Friday, 17 April 2015

How To Speed Up Your Android Phone quickly

Whether you have an old clunker of an Android phone or a brand new flagship handset like the Galaxy S6 or HTC One M9, there is one thing that holds true across the board: your phone can be faster. That’s right… as fast as Samsung and HTC’s new premium smartphones feel out of the box, they can still move even quicker.
And you’ll be shocked at how easy it is to speed them up without any third-party software, complicated “rooting” or other complex hacks.
Here’s what you need to do:
First, you’ll need to enable access to the hidden “Developer options” menu on your Android phone. To do that, simply tap the “About phone” option in Settings. Then tap “Build number” seven times and you’re done. Now you can just back out to the main Settings menu and you’ll find Developer options somewhere near the bottom of the list.
Now that you’re done with that part, the real fun begins. Tap the new Developer options menu you just enabled and scroll until you see the following three settings (note that they may be located within an “Advanced” subsection):
Window animation scale
Transition animation scale
Animator animation scale
See them? By default, each of those three options is set to “1x” but tapping them and changing them to “.5x” will dramatically speed up your phone. This harmless tweak forces the device to speed up all transition animations, and the entire user experience is faster and smoother as a result.

How to Record Skype Video and Audio calls for Windows and Mac


Pamela [Win]


It is free to download and allows you to record calls you make usingSkype. It works on Windows devices and according to the website its certified by Skype. Here is a list all the features that it has: Skype Call Recording Skype Video Recording Skype Chat Recording Skype Call Transfer Skype Call Scheduler Record calls automatically Mono/Stereo recording option Skype Conference Call manager Create cool mood messages Answering Machine Play sounds during calls Blogging & Podcasting.


MP3 Skype Recorder [Win]


It allows you to record calls you make using Skype. It’s features include: It’s absolutely free with no limits attached. Automatic or manual recording capabilities. Compact format of stored records (mp3 files). May be used to record P2P, SkypeOut calls and calls made to Online number. Can split the caller and the person called into different tracks, saving it separately Easy integration with Skype Conference recording. Intuitive easy to use interface. It is made for Windows users and the software is aimed for professional recordings of Skype conversations. Which is great when you need to keep track of phone conversations, either by legal requirements, or for job security. It works in the background and begins to record conversations automatically at the exact moment they start. However you can also record conversations manually, which is better . All the recordings are stored in convenient MP3, OGG, WMA or WAV format.

WireTap Studio [Mac]


It lets you record, edit, and export all audio on your Mac, from a specific app (like Skype or iTunes) or an external microphone. For tasks, like recording an iChat conversation, you can access WireTap Studio’s features directly from its streamlined controller window. The rest of WireTap Studio’s interface is also reassuringly easy to use, with handy tools for editing. It has a nifty feature which allows you to record from two sources at once. However it comes with a price tag of $69.

Ecamm Call Recorder [Mac]


The only App which comes gives you recording controls in Skype. It comes with an automatic recording feature like MP3 Skype Recorder. After each recording the files are saved into a folder on your Mac, with the callers name and date. Other features it boasts: Record Video Calls with Picture-in-Picture Share Recordings in MP3 Format Designed for Mac Users by Mac Users Advanced Compression Technology Saves Space Ecamm costs $19.95 to purchase but you can download a free demo here. If you’re looking for a device for both Mac and PC then give IMcapture a try.

IMcapture [Mac/Win]


This App captures and records audio calls made from Skype. The calls are saved in MP4-AAC format. It is great for personal use. Other features include: Record audio Skype Share recorded calls Playback important Create a CD from a saved call to distribute New Skype 5.0 support Record Audio or Video Record Audio and Video Start and stop recording any time Time Lapse indicator Output Folder location control MP3, WMA or AAC audio file formats Quicktime Movies (MOV), MPEG4, MPEG, VOB, PSP MPEG4, SWF and FLV video file formats. IMcapture’s control panel is straightforward and easy to use. With the ability to record audio calls automatically or start and stop recording where you like. You can also change the Sample Rate to improve the recording quality or decrease the file size. It costs $49.95

Thursday, 16 April 2015

100 Windows Shortcuts


100 Known and Unknown Windows shortcuts.
CTRL+C (Copy)
CTRL+X (Cut)
CTRL+V (Paste)
CTRL+Z (Undo)
Delete (Delete)
Shift+Delete (Delete the selected item permanently without placing the item in the Recycle Bin)
CTRL while dragging an item (Copy the selected item)
CTRL+Shift while dragging an item (Create a shortcut to the selected item)
F2 key (Rename the selected item)
CTRL+RIGHT ARROW (Move the insertion point to the beginning of the next word)
CTRL+LEFT ARROW (Move the insertion point to the beginning of the previous word)
CTRL+DOWN ARROW (Move the insertion point to the beginning of the next paragraph)
CTRL+UP ARROW (Move the insertion point to the beginning of the previous paragraph)
CTRL+Shift with any of the arrow keys (Highlight a block of text)
Shift with any of the arrow keys (Select more than one item in a window or on the desktop, or select text in a document)
CTRL+A (Select all)
F3 key (Search for a file or a folder)
Alt+Enter (View the properties for the selected item)
Alt+F4 (Close the active item, or quit the active program)
Alt+Enter (Display the properties of the selected object)
Alt+Spacebar (Open the shortcut menu for the active window)
CTRL+F4 (Close the active document in programs that enable you to have multiple documents open simultaneously)
Alt+Tab (Switch between the open items)
Alt+ESC (Cycle through items in the order that they had been opened)
F6 key (Cycle through the screen elements in a window or on the desktop)
F4 key (Display the Address bar list in My Computer or Windows Explorer)
Shift+F10 (Display the shortcut menu for the selected item)
Alt+Spacebar (Display the System menu for the active window)
CTRL+ESC (Display the Start menu)
Alt+Underlined letter in a menu name (Display the corresponding menu)
Underlined letter in a command name on an open menu (Perform the corresponding command)
F10 key (Activate the menu bar in the active program)
RIGHT ARROW (Open the next menu to the right, or open a submenu)
LEFT ARROW (Open the next menu to the left, or close a submenu)
F5 key (Update the active window)
Backspace (View the folder one level up in My Computer or Windows Explorer)
ESC (Cancel the current task)
Shift when you insert a CD-ROM into the CD-ROM drive (Prevent the CD-ROM from automatically playing)
Dialog Box Keyboard Shortcuts
CTRL+Tab (Move forward through the tabs)
CTRL+Shift+Tab (Move backward through the tabs)
Tab (Move forward through the options)
Shift+Tab (Move backward through the options)
Alt+Underlined letter (Perform the corresponding command or select the corresponding option)
Enter (Perform the command for the active option or button)
Spacebar (Select or clear the check box if the active option is a check box)
Arrow keys (Select a button if the active option is a group of option buttons)
F1 key (Display Help)
F4 key (Display the items in the active list)
Backspace (Open a folder one level up if a folder is selected in the Save As or Open dialog box)
Microsoft Natural Keyboard Shortcuts
Win (Display or hide the Start menu)
Win+BREAK (Display the System Properties dialog box)
Win+D (Display the desktop)
Win+M (Minimize all of the windows)
Win+Shift+M (Restore the minimized windows)
Win+E (Open My Computer)
Win+F (Search for a file or a folder)
CTRL+Win+F (Search for computers)
Win+F1 (Display Windows Help)
Win+ L (Lock the keyboard)
Win+R (Open the Run dialog box)
Win+U (Open Utility Manager)
Accessibility Keyboard Shortcuts
Right Shift for eight seconds (Switch FilterKeys either on or off)
Left Alt+left Shift+PRINT SCREEN (Switch High Contrast either on or off)
Left Alt+left Shift+NUM LOCK (Switch the MouseKeys either on or off)
Shift five times (Switch the StickyKeys either on or off)
NUM LOCK for five seconds (Switch the ToggleKeys either on or off)
Win +U (Open Utility Manager)
Windows Explorer Keyboard Shortcuts
END (Display the bottom of the active window)
HOME (Display the top of the active window)
NUM LOCK+* (Display all of the subfolders that are under the selected folder)
NUM LOCK++ (Display the contents of the selected folder)
NUM LOCK+- (Collapse the selected folder)
LEFT ARROW (Collapse the current selection if it is expanded, or select the parent folder)
RIGHT ARROW (Display the current selection if it is collapsed, or select the first subfolder)
Shortcut Keys For Character Map
After you double-click a character on the grid of characters, you can move through the grid by using the keyboard shortcuts:
RIGHT ARROW (Move to the right or to the beginning of the next line)
LEFT ARROW (Move to the left or to the end of the previous line)
UP ARROW (Move up one row)
DOWN ARROW (Move down one row)
PAGE UP (Move up one screen at a time)
PAGE DOWN (Move down one screen at a time)
HOME (Move to the beginning of the line)
END (Move to the end of the line)
CTRL+HOME (Move to the first character)
CTRL+END (Move to the last character)
Spacebar (Switch between Enlarged and Nor mal mode when a character is selected)
Microsoft Management Console (MMC) Main Window Keyboard Shortcuts
CTRL+O (Open a saved console)
CTRL+N (Open a new console)
CTRL+S (Save the open console)
CTRL+M (Add or remove a console item)
CTRL+W (Close window/tab)
F5 key (Update the content of all console windows)
Alt+Spacebar (Display the MMC window menu)
Alt+F4 (Close the console)
Alt+A (Display the Action menu)
Alt+V (Display the View menu)
Alt+F (Display the File menu)
Alt+O (Display the Favorites menu)
MMC Console Window Keyboard Shortcuts
CTRL+P (Print the current page or active pane)
Alt+- (Display the window menu for the active console window)
Shift+F10 (Display the Action shortcut menu for the selected item)
F1 key (Open the Help topic, if any, for the selected item)
F5 key (Update the content of all console windows)
CTRL+F10 (Maximize the active console window)
CTRL+F5 (Restore the active console window)
Alt+Enter (Display the Properties dialog box, if any, for the selected item)
F2 key (Rename the selected item)
CTRL+F4 (Close the active console window. When a console has only one console window, this shortcut closes the console)
Remote Desktop Connection Navigation
CTRL+Alt+END (Open the m*cro$oft Windows NT Security dialog box)
Alt+PAGE UP (Switch between programs from left to right)
Alt+PAGE DOWN (Switch between programs from right to left)
Alt+INSERT (Cycle through the programs in most recently used order)
Alt+HOME (Display the Start menu)
CTRL+Alt+BREAK (Switch the client computer between a window and a full screen)
Alt+Delete (Display the Windows menu)
CTRL+Alt+- (Place a snapshot of the active window in the client on the Terminal server clipboard and provide the same functionality as pressing PRINT SCREEN on a local computer.)
CTRL+Alt++ (Place a snapshot of the entire client window area on the Terminal server clipboard and provide the same functionality as pressing Alt+PRINT SCREEN on a local computer.)
Internet Explorer Navigation
CTRL+B (Open the Organize Favorites dialog box)
CTRL+E (Open the Search bar)
CTRL+F (Start the Find utility)
CTRL+H (Open the History bar)
CTRL+I (Open the Favorites bar)
CTRL+L (Open the Open dialog box)
CTRL+N (Start another instance of the browser with the same Web address)
CTRL+O (Open the Open dialog box, the same as CTRL+L)
CTRL+P (Open the Print dialog box)
CTRL+R (Update the current Web page)
CTRL+W (Close the current window)

Type "Find My Phone" On Google to locate your lost phone


Google is a digital genie. You type your wishes into a search bar and -POW- there it is, what you are looking for. Now you can even use Google to find tangible objects, as long as the object you are looking for is your Android phone. Just type the words 'find my phone' into any google search bar from your computer and in seconds Google will locate your device on a map and give you the option to make it ring.

Android users have been able to find their devices remotely for a while now, but until today you had to log into Android Device Manager on another mobile device or your computer to start your search. I guess this new option doesn't save a ton of time but let's be honest - when your phone is missing, it feels like part of you is missing, so every second counts.


If, after your device is located, you find it is in an unsecure location you can click on the map to be redirected to the full Android Device Manager page where you will find the options to remotely lock or wipe your phone.

Monday, 13 April 2015

Want to monitor your net speed..?? Here we go

Today everyone wants to monitor their internet speed but for that they need to install some Custom ROMs. For that these ROMs require your device to be rooted though.
what if we get this feature on your Non-rooted phone.
Here is the app which let you monitor your network:
internet speed meter


Features:-
*Internet Speed Update in status bar with Details Notification.
*Daily traffic usage.
*30 Days Data Usage History(From day of install)
*Minimal Battery Consuming.
*auto start app on every phone boot()
*Auto Start on Boot(Chanable)
*Hide on Idle(Changeble)
*Hide on Lockcreen 'For Lolipop Users only' (Changable)
*Hide when not connected to internet (Changeable)
*Monitor Update Interval (from 0.5 second to 5 seconds)
*Real Time Traffic in Graph
*No Ads in App

Sunday, 5 April 2015

How To Enable Start Menu Button In Windows 8

If you are using a PC without Start Menu we feel lost, you are not alone. Not putting start menu in Windows 8 was the biggest mistake committed by Microsoft.
Windows 10 is going to be launched this summer and it will feature a full-fledged start menu. Till, instead of missing the beloved start menu in your Windows 8 PC, you can bring Start Menu back. Here  is the way to get back the Start Menu.
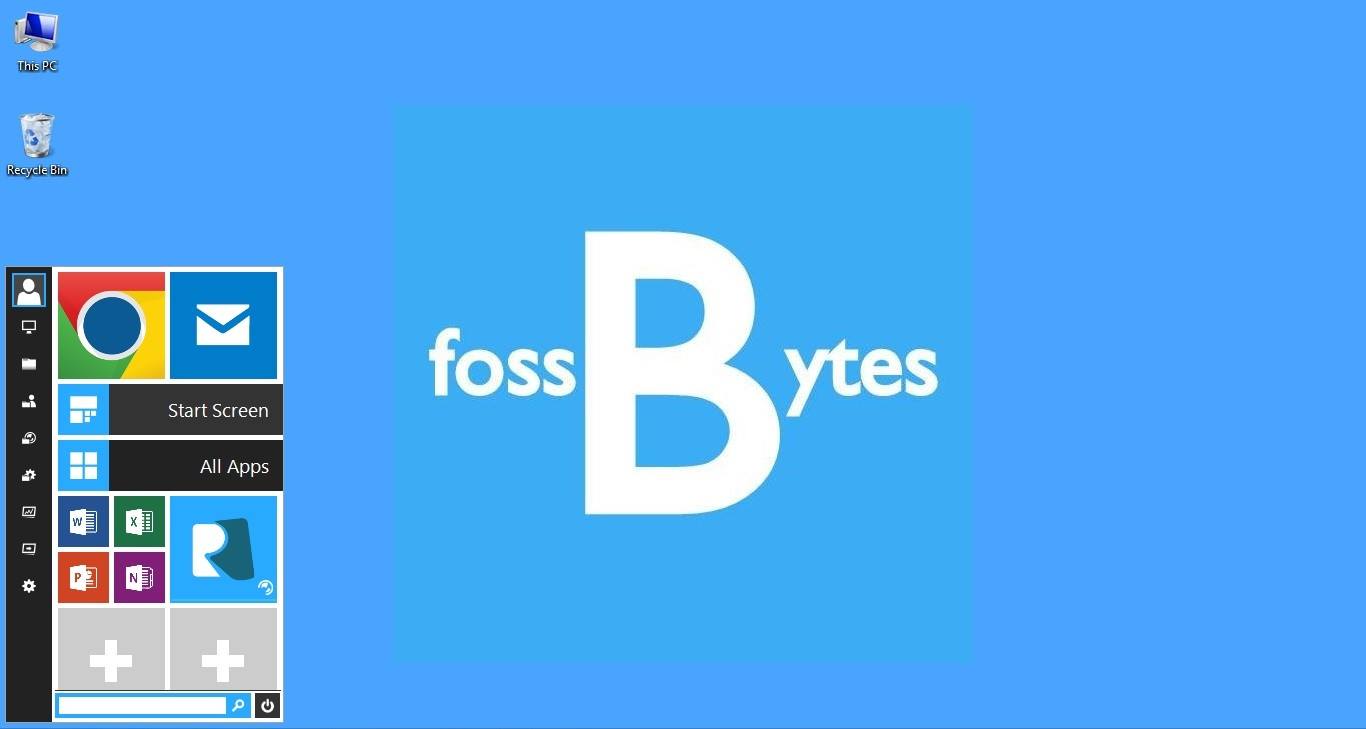
1. Start Menu Reviver 2
Start Menu Reviver 2 looks quite fancy after installation and it has touch screen friendly option. With total 64 tiles space and Windows 7 mode view it’ll give you complete feeling of Windows Start button. With this you can create shortcuts for Website, apps, music etc. Also, Reviver 2 has the most demandable search box at bottom where you can find programs and files by typing their names.To enable Start button in Windows 8, you need to download the link and simply install it in your system. Once you’ve installed, you will find Start Button enabled in your Windows 8.

2. ViStart

ViStart 8 too is a good option to choose. Although it is not devided into tiles which is the very basic UI of Window 8, but it seems to be friendly for those who’ve used Windows 7 before. You can choose different varity of skins with ViStart.
To enable Start button in Windows 8 you need to download the link and simply install it in your system. Once installed, you will find Start Button enabled in your Windows 8.

Saturday, 4 April 2015

How to speed-up internet speed using DNS Hack


There are many ways to increase your internet speed out of which DNS Hack is one.
when we have slow internet connection we will surely blame our internet service provider. This not actually happens all times rather there is problem with our domain.


What is DNS?


DNS means Domain Name System (Service/Server) it converts your domain names into IP addresses.

The domain names are usually alphabetic for us to remember easily, but in actuality the Internet works on IP addresses. The DNS converts the domain name into its corresponding IP address, each time it is used as such. The DNS has a network of its own i.e. one DNS server can ask other DNS servers about translating a specific domain name to its corresponding IP address till it gets the correct result.

example: consider Domain name www.google.com could correspond to IP adress 74.125.224.72


How To Speed Up Web Browsing Using DNS Hack?


Step 1:

To increase internet speed using OpenDNS, first open Control panel.

Step 2:

Go to Network and Internet options.network-and-internet
Step 3:
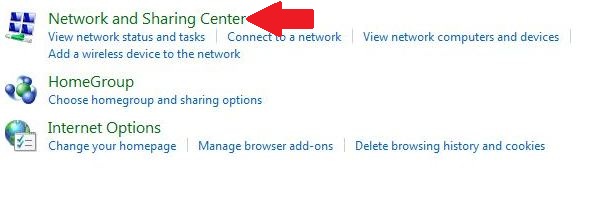
Now click on Network and Sharing Center.
network-and-sharing-center
Step 4:
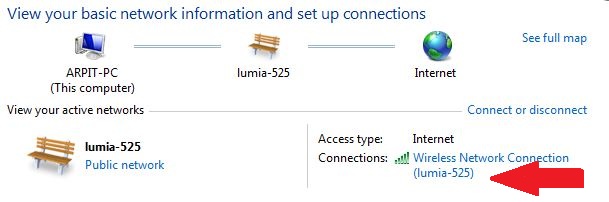
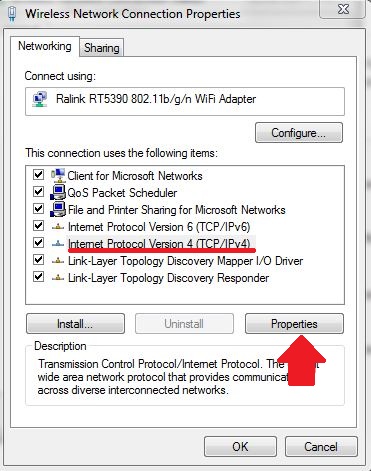
Click on your Internet Connection and then click on Properties.
internet-connection
Step 5:
Highlight the Internet Protocol Version 4 (TCP/IPv4) and click on Properties.
DNS-hack-faster-browse
Step 6:


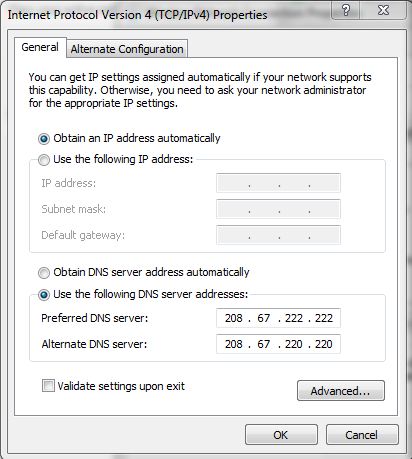
Now choose the following DNS server addresses to get a faster internet speed:
Preferred DNS server: 208.67.222.222
Alternate DNS server: 208.67.220.220

ipv4-config-speedup-browsing
You are using OpenDNS’s servers now which helps you to to get a faster internet speed.
To Configure IPv6:


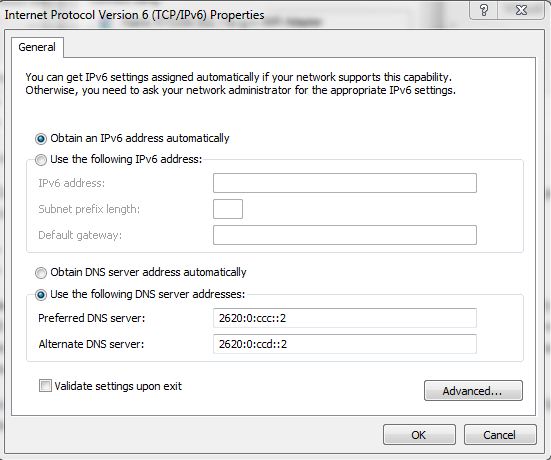
  • Highlight the Internet Protocol Version 6 (TCP/IPv6) and click on Properties, and choose the following DNS server addresses:
    Preferred DNS server: 2620:0:ccc::2
    Alternate DNS server: 2620:0:ccd::2
    DNS-hack-faster-browsing